前言
入门系列是本人跟字母哥Binary的课程进行学习以及自身感悟的笔记,支持正版从我做起。
本人Fork下来的ET8学习项目,release8.1的分支,2024-03-20开始的节点,可以根据节点情况进行学习。
`ET`框架中的`ECS`编程原则
实体既组件,组件既实体。- 如要编写一个新的
实体或者组件,绝不继承除Entity之外的任何父类!(糟糕的OOP写法(说是这么说,我只能说ET限定)) - 绝不使用任何的虚函数,使用逻辑分发替代。
Model和ModelView只存放实体和组件的数据字段声明,如非必要绝不放任何逻辑函数Hotfix和Hotfixview中只保留纯逻辑函数,也就是使用静态类和扩展方法编写的System,且绝不允许声明任何数据字段。Model和Hotfix项目中绝不允许出现跟Unity3d引擎相关的游戏对象类和调用相关API函数。- 如实体或组件有数据字段声明必须编写相关生命周期函数,以防实体对象池回收再利用导致逻辑错误。
名词解析及定义
Model和ModelView用于存放实体的声明和定义。Model是逻辑层,不能引用任何Unity类库的类。ModelView是表现层,允许引用Unity类库的类。
Hotfix和HotfixView用于存放实体的函数。Hotfix用于编写逻辑层的函数。HotfixView用于编写表现层的函数。
例子
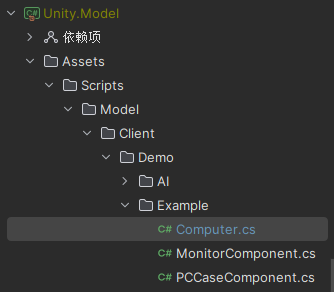
在Model目录下创建一个电脑实体,两个电脑的组件(显示器和机箱)。
根据不同的需求,使用不同的命名空间标记使用者。如在客户端使用则为ET.Client,如在服务端使用则为ET.Server,如在双端使用则为ET。而存放目录也同理,分别为Client/Server/Share这三个文件夹。
namespace ET.Client
{
    //该实体类属于指定的实体类,如果为唯一则添加typeof指定,任意父实体就不需要。
    [ChildOf(typeof(Scene))]
    //无论是实体还是组件,都必须继承Entity
    //而IAwake IUpdate IDestroy是生命周期函数,按需添加即可
    public class Computer : Entity, IAwake, IUpdate, IDestroy
    {

    }
}
namespace ET.Client
{
    //该组件类属于指定的实体类,添加typeof指定,任意父实体就不需要。
    [ComponentOf(typeof(Computer))]
    public class PCCaseComponent : Entity,IAwake
    {

    }
}
namespace ET.Client
{
    [ComponentOf(typeof(Computer))]
    //IAwake允许传入指定的参数,最多四个(可在源码里按需添加)
    public class MonitorComponent : Entity ,IAwake<int>,IDestroy
    {
        public int Brightness;
    }
}
此时我们已经创建出了最基本的树状关系图,那么我们如何创建它呢?
因为电脑可能会有很多台,那么此时我们首先需要创建出用于挂载电脑实体的集合组件,便于统一进行管理调度。
在刚刚的目录下创建ComputersComponent类,代码如下:
namespace ET.Client
{
    //该组件属于场景根节点
    [ComponentOf(typeof(Scene))]
    public class ComputersComponent : Entity ,IAwake
    {

    }
}
对应的,我们将原本Computer指定的父实体标记进行调整,调整后的代码如下:
namespace ET.Client
{
    //该实体类属于指定的实体类,添加typeof指定,任意父实体就不需要。
    [ChildOf(typeof(ComputersComponent))]
    //无论是实体还是组件,都必须继承Entity
    //而IAwake IUpdate IDestroy是生命周期函数,按需添加即可
    public class Computer : Entity, IAwake, IUpdate, IDestroy
    {

    }
}
然后我们找到EntryEvent3_InitClient,也就是整个游戏的入口函数3,在合适的位置添加创建电脑实体集合组件的代码。代码如下:
namespace ET.Client
{
    [Event(SceneType.Main)]
    public class EntryEvent3_InitClient: AEvent<Scene, EntryEvent3>
    {
        protected override async ETTask Run(Scene root, EntryEvent3 args)
        {
            GlobalComponent globalComponent = root.AddComponent<GlobalComponent>();
            root.AddComponent<UIGlobalComponent>();
            root.AddComponent<UIComponent>();
            root.AddComponent<ResourcesLoaderComponent>();
            root.AddComponent<PlayerComponent>();
            root.AddComponent<CurrentScenesComponent>();
            //添加创建电脑组件集合的组件
            root.AddComponent<ComputersComponent>();

            // 根据配置修改掉Main Fiber的SceneType
            SceneType sceneType = EnumHelper.FromString<SceneType>(globalComponent.GlobalConfig.AppType.ToString());
            root.SceneType = sceneType;

            await EventSystem.Instance.PublishAsync(root, new AppStartInitFinish());
        }
    }
}
我们可以看到在代码结尾处抛出了AppStartInitFinish事件,让我们找到引用了AppStartInitFinish的类AppStartInitFinish_CreateLoginUI,添加创建电脑实体的方法,代码如下:
namespace ET.Client
{
    [Event(SceneType.Demo)]
    public class AppStartInitFinish_CreateLoginUI: AEvent<Scene, AppStartInitFinish>
    {
        protected override async ETTask Run(Scene root, AppStartInitFinish args)
        {
            await UIHelper.Create(root, UIType.UILogin, UILayer.Mid);

            //创建电脑实体,给1挂载组件,2不动
            var computer1 = root.GetComponent<ComputersComponent>().AddChild<Computer>();
            var computer2 = root.GetComponent<ComputersComponent>().AddChild<Computer>();

            //添加机箱组件
            computer1.AddComponent<PCCaseComponent>();
            //添加显示器组件,并指定亮度
            computer1.AddComponent<MonitorComponent,int>(30);
        }
    }
}
Child可以创建任意数量,而实体上挂载的Component有且只能有一个。
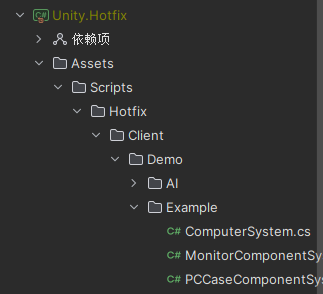
接下来编写逻辑代码,对实体进行操作。在
Hotfix下创建对应的文件夹与类,分别为电脑操作类和剩余组件的操作类。
打开
ComputerSystem进行修改,添加标记。注意这里必须添加static partial,因为在ET框架里会自动生成刚刚所添加的IAwake等接口的生命周期的分类,且需要使用到扩展方法。一个基础的结构如代码所示:namespace ET.Client
{
//实体组件通用的System标记,必须指定类型
[EntitySystemOf(typeof(Computer))]
public static partial class ComputerSystem
{
}
}
如果编译以及构建正确的情况下,可以直接选中ComputerSystem,使用快捷操作生成对应生命周期的函数。生成后我们填入测试代码,代码如下:
namespace ET.Client
{
    //实体组件通用的System标记,必须指定类型
    [EntitySystemOf(typeof(Computer))]
    public static partial class ComputerSystem
    {
        [EntitySystem]
        private static void Awake(this Computer self)
        {
            Log.Debug("Computer Awake");
        }

        [EntitySystem]
        private static void Update(this Computer self)
        {
            Log.Debug("Computer Update");
        }

        [EntitySystem]
        private static void Destroy(this Computer self)
        {
            Log.Debug("Computer Destroy");
        }

        //自己编写的给外部调用的测试方法
        public static void Open(this Computer self)
        {
            Log.Debug("Computer Open");
        }
    }
}
其它两个类如法炮制,代码如下:
namespace ET.Client
{
    [EntitySystemOf(typeof(PCCaseComponent))]
    public static partial class PCCaseComponentSystem
    {
        [EntitySystem]
        private static void Awake(this PCCaseComponent self)
        {
            Log.Debug("PCCaseComponent Awake");
        }
    }
}
namespace ET.Client
{
    [EntitySystemOf(typeof(MonitorComponent))]
    //数据修改友好标记,允许修改指定类型上的数据
    [FriendOf(typeof(ET.Client.MonitorComponent))]
    public static partial class MonitorComponentSystem
    {
        [EntitySystem]
        private static void Awake(this ET.Client.MonitorComponent self, int brightness)
        {
            Log.Debug("MonitorComponent Awake");

            //修改亮度
            self.Brightness = brightness;
        }

        [EntitySystem]
        private static void Destroy(this ET.Client.MonitorComponent self)
        {
            Log.Debug("MonitorComponent Destroy");
        }

        public static void ChangeBrightness(this MonitorComponent self, int value)
        {
            self.Brightness = value;
        }
    }
}
回到AppStartInitFinish_CreateLoginUI类中,添加对应方法,修改后代码如下:
namespace ET.Client
{
    [Event(SceneType.Demo)]
    public class AppStartInitFinish_CreateLoginUI: AEvent<Scene, AppStartInitFinish>
    {
        protected override async ETTask Run(Scene root, AppStartInitFinish args)
        {
            await UIHelper.Create(root, UIType.UILogin, UILayer.Mid);

            //创建电脑实体,给1挂载组件
            var computer1 = root.GetComponent<ComputersComponent>().AddChild<Computer>();

            //添加机箱组件
            computer1.AddComponent<PCCaseComponent>();
            //添加显示器组件,并指定亮度
            computer1.AddComponent<MonitorComponent,int>(30);

            //电脑开机
            computer1.Open();

            //修改亮度
            computer1.GetComponent<MonitorComponent>().ChangeBrightness(5);

            //等待3秒
            await root.GetComponent<TimerComponent>().WaitAsync(3000);

            //销毁
            computer1?.Dispose();
        }
    }
}
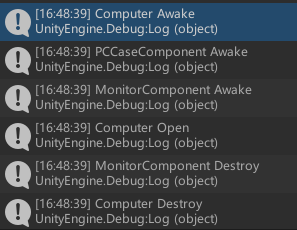
启动运行后,显示结果如图即为大功告成。